Discover the evolution of the Kognetiks Chatbot, from support assistant to Knowledge Navigator, featuring new speech recognition and AI model updates.
Back in May of 2024 I created the Kognetiks Chatbot Support Bot to be a helpful assistant that knows everything about the installation and configuration of the Kognetiks Chatbot for WordPress plugin. The intention was to leverage ChatGPT to answer support questions about the chatbot – to do the very thing that I designed the plugin to do for others to do for myself.
I had a few documents about the workings of the chatbot set aside, but no comprehensive documentation of all the features. Just scattered items saved here and there. It was about this time that I overhauled the Support tab in the Chatbot Setting to incorporate in one place explanations of all the settings, screenshots, tips and tricks, and some additional content about the chatbot.
The Support tab content was a rich source of information. So, I set about transforming it into a format the could be uploaded to an Assistant. I wrote a Python program that took all the information found in those document and compiled one PDF document. This would be the core knowledge base that I attached to the Assistant.
In the beginning I used the assistant for testing features and functions of the chatbot during development. I asked it over and over again what the current version of the chatbot was. It reliably returned the current version based on the documentation I uploaded as a vector file to the Assistant on the OpenAI platform.
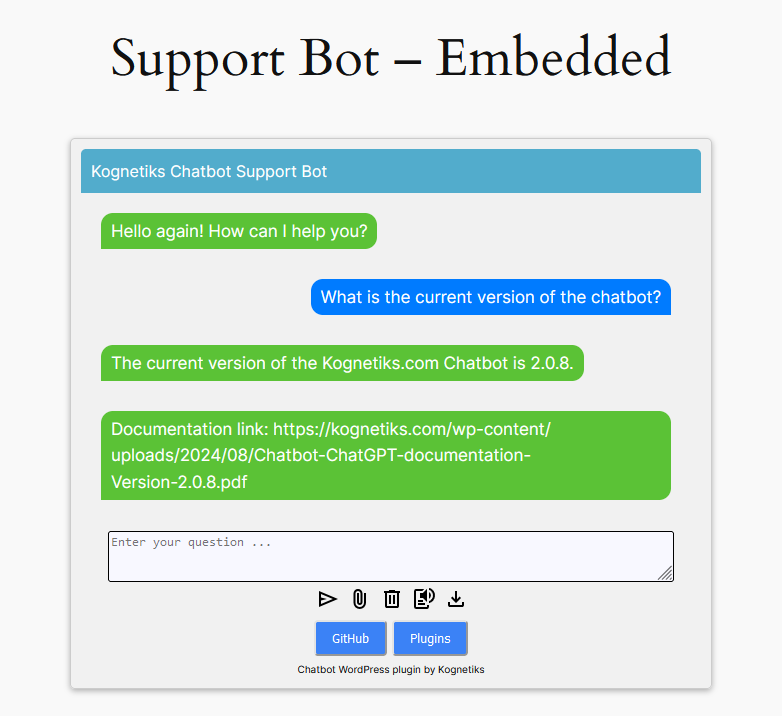
It wasn’t long before I decided that the Assistant was solid and I should deploy it as a support chatbot on the Kognetiks.com website. I initially placed it deep within the site. I’ve since made support bot more visible. You can find a link to it on the Support page of Kognetiks.com website. There is a button that says, “Ask the Kognetiks Chatbot for help!”

It wasn’t long before I realized that the support bot’s vector stores would benefit not only from the online support documentation embedded within the plugin itself, but also by the inclusion of selected posts about features and enhancements that have been posted on this site.
So, I went back into my site and tagged all the relevant posts with “Kognetiks Documentation”. Then I wrote another program to retrieve each of the posts with that tag, format and output those posts as a PDF, that I could then upload to the Assistant. Which I did and it’s what you’ll find if you use the support bot today.
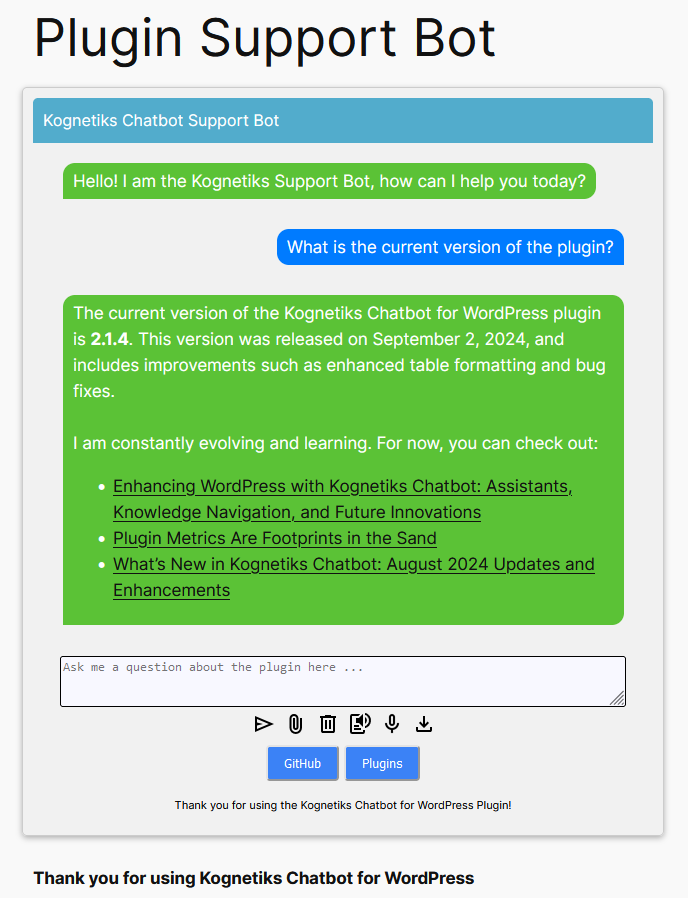
Of course, I started by asking my favorite question, “What is the current version of the chatbot?” That’s my test question to make sure everything is working end-to-end. If it returns the correct answer, I know that everything is wired up correctly, from the chatbot interface, to the API, to the Assistant, and back.
I was pleasantly surprised with an enhanced response from the chatbot but somewhat disconcerted about the quality of the back links into my website. The Knowledge Navigator is supposed to know all about my site and if the setting is enabled, it’s supposed to return relevant links to content on my site.
When I looked at the initial response, I realized right aways that the Knowledge Navigator algorithm needed some tweaking. How it works is like this. It scans the website where the plugin is installed, uses a Term Frequence – Inverse Document Frequency (TF-IDF) algorithm to rank words found in the published posts, pages and products on the site, and creates a useful index for retrieval. The data includes the word, its score, and where it is found on the site, so that the enhancement function can generate relevant links to site content where those terms are found.
The chatbot uses the input prompt, without the “stop words” (such as “a”, “and”, “the”, etc.) to sift through the TF-IDF results to find match relevant content on the site based words in the prompt.
The results were stellar. The links to content were stale. So, I spent some time with my development team (i.e., ChatGPT) updating the algorithm to look for content based on overlapping word rankings to score documents higher that had all the words versus some of the words. The last step was to return the most recent documents rather than the older ones. The results: significantly improved links to posts on the site.
Updates to the Chatbot in Version 2.1.5
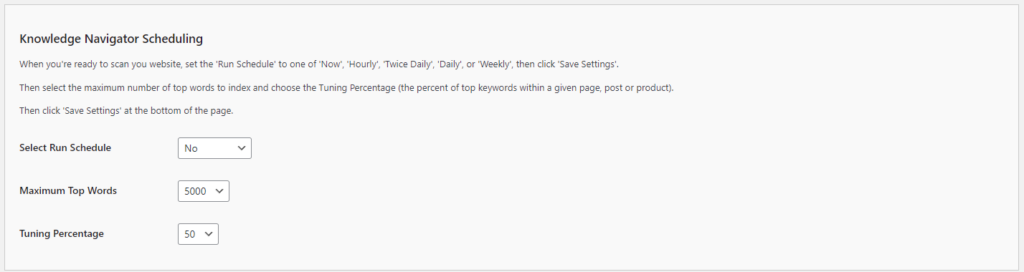
The big update of course is the revision to the Knowledge Navigator. This update should provide more relevant and fresher results based on the site content. To schedule a run, go to the Chatbot Settings, click on the Knowledge Navigator tab, then scroll down to select the appropriate settings for frequency of run, the maximum top words, and the tuning percentage.
Select Run Schedule allows you to choose from once, hourly, twice daily, weekly, disable, or cancel. Use disable to never run the indexer or cancel to stop running the indexer.
The Maximum Top Words will depend on the amount of content you have on your site. You can choose from 500 to 10,000 in increments of 500. I have a modest site but have selected 5,000.
The Tuning Percentage is the depth of content on each page, post or product, expressed as a percentage. If you have a lot of content, i.e., many pages, posts and products, you might choose to index fewer words on each page. If you have a site with less content, you might choose to go deeper. I use 50% for the Kognetiks.com website. It has a modest amount of content so I don’t mind deep on any given page.
The Knowledge Navigator Include/Exclude Settings allows you to include or exclude published posts, pages, products, and approved comments. NOTE: Approved Comments will always default to “No” and currently you are not able to override this. While comments are interesting, I’m not unsure as to whether they should be indexed as part of a site. If you find the desire to include approved comments in your index, let me know and I can provide guidance on how to override the exclusion.
The Knowledge Navigator Enhanced Response Settings enables adding links into your content as part of the chatbot’s response. If you want additional content to be included in the chatbot’s response, these are the settings to adjust.
The Suppress Learning Messages has three settings: None, Random, or Custom. Change this setting to None to exclude adding any links into your content as part of the chatbot’s response. Use Random to have a mix of a half dozen different messages that accompany the links to your content, such as: “I am constantly evolving and learning. For now, you can check out:” or “Just a heads up – I am actively improving each day. Meanwhile, you can explore more information at:”.
If you prefer, you can add your own Custom Learnings Message to the response returned by the chatbot, for example: “More information may be found here …” might be most appropriate.
In this section you can set the Enhanced Response Limit which sets the maximum number of responses that returned between 1 and 10. If there are fewer matches then fewer links will be included.
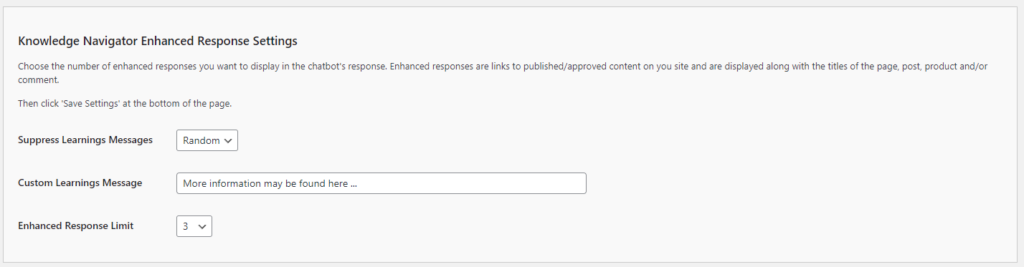
Remember, if you make any changes to any of the settings be sure to click the “Save Settings” button at the bottom of the screen.
Speech Recognition
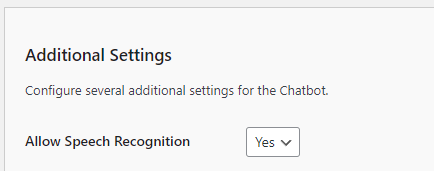
The other big update to the chatbot is there is now an option to enable speech recognition. Among the many Chatbot Settings, on the Settings tab, you’ll find in the Additional Settings the option to Allow Speech Recognition. If set to “Yes” then a microphone icon will appear among the chatbot controls on its user interface. If set to “No”, then no microphone will appear.
In initial experiments I found that speech recognition was solid in Chrome, a little shaky in Edge, and no supported in Firefox. So, it’s likely that more work needs to be done in this area. But this is a start.
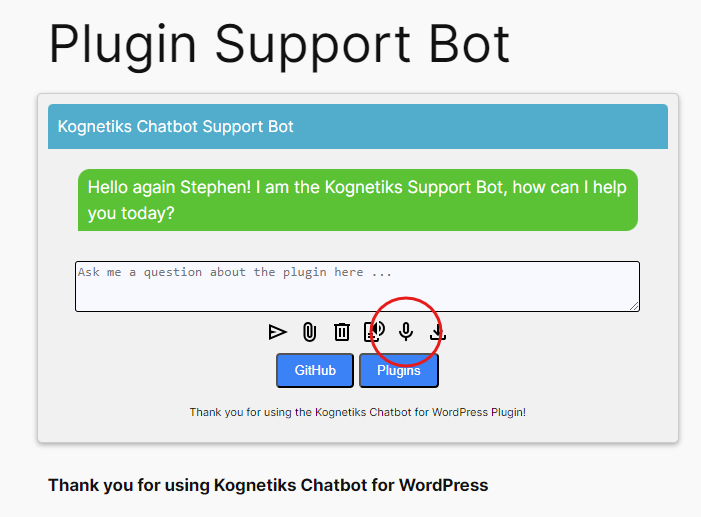
Clicking the microphone button will enable speech recognition. Clicking it a second time will stop it. Users will be asked to allow the user of their microphones.
The Read Aloud feature of the chatbot is not yet connected to the Speech Recognition function but will be in a future release. This will complete the loop with speech in and speech out, thus setting the stage for more advanced capabilities if OpenAI’s Advanced Voice Mode is enabled via the API. Advanced Voice Mode on ChatGPT is currently in a limited alpha available in the Android and iOS apps.
New Models – GPT-4o-mini, o1-preview, o1-mini
The GPT series of models are advancing rapidly. Not all models are available on the API or available in the list of models to choose from with building out Assistants. That being said, the list of models is updated in real time in the Chatbot Settings. So, if new models become available, then you can choose from them right away.
The “o” which stands for “omni” is OpenAI’s most advanced model category with the “mini” being a smaller model. They’re multimodal meaning they can access text or images as input while outputting text.
The “o1” series of models are trained with reinforcement learning algorithms and are designed to handle complex reasoning tasks. In essence, they “think before they answer”. According to OpenAI’s website, these two model types are best explained as:
- o1-preview: Reasoning model designed to solve hard problems across domains.
- o1-mini: Faster and cheaper reasoning model particularly good at coding, math, and science.
I’ve used both and I have some preliminary thoughts on the “o1” series of models which I share in a follow-up more detailed post.
Final Thoughts
That about covers everything that has been going on with the development of the Kognetiks Chatbot for WordPress plugin. As always, want to thank each of you who have taken time to share valuable feedback. It helps me continually improve the chatbot and provide a better experience for the entire install base.
Supercharge Your WordPress Site with the Kognetiks Chatbot!
Are you ready to enhance user engagement and streamline communication on your website? The Kognetiks Chatbot for WordPress plugin makes it easy to provide instant, AI-powered responses to your visitors. Whether you need a customer support tool, a way to automate FAQs, or simply want to create a more interactive user experience, the Kognetiks Chatbot for WordPress has you covered. Your users will love the convenience, and you’ll enjoy the increased engagement. Try it now and see the difference!
Download the Chatbot Plugin today!
#WordPressPlugins #WordPressAI #AIChatbots
About the Author

Stephen Howell is a multifaceted expert with a wealth of experience in technology, business management, and development. He is the innovative mind behind the cutting-edge AI powered Kognetiks Chatbot for WordPress plugin. Utilizing the robust capabilities of OpenAI’s API, this conversational chatbot can dramatically enhance your website’s user engagement. Visit Kognetiks Chatbot for WordPress to explore how to elevate your visitors’ experience, and stay connected with his latest advancements and offerings in the WordPress community.
Leave a Reply
You must be logged in to post a comment.