Using the Kognetiks Chatbot for WordPress
Displaying the user and visitor conversation histories on your WordPress website using the logged data from the Kognetiks Chatbot plugin can be done quickly with a shortcode.
Conversation History is available for logged in users and visitors alike. Logged in users will have access to the retained conversation history. Whereas visitors may only have access to their conversation history until their session identifier expires.
Users and visitors alike can only view their own conversations.
Here’s a step-by-step guide:
Step 1: Open the WordPress Editor
- Log in to your WordPress admin dashboard.
- Navigate to the page or post where you want to display the conversation history.
- Click “Edit” to open the page in the WordPress block editor.
Step 2: Add the Shortcode Block
- Click on the ‘+’ icon to add a new block.
- Search for “Shortcode” in the block selector.
- Select the “Shortcode” block to insert it onto your page.
Step 3: Insert the Conversation History Shortcode
- Inside the Shortcode block, enter the following shortcode:
[chat_history]
Step 4: Publish or Update Your Page
- Once you’ve added the shortcode, click “Update” or “Publish” in the upper right corner of your editor.
Step 5: Verify the Display
- View your live page or preview the changes to ensure the conversation history appears correctly.
Configuring the Conversation History Settings
- Navigate to your WordPress dashboard.
- Go to your Kognetiks Chatbot plugin settings and select the “Reporting ” section.
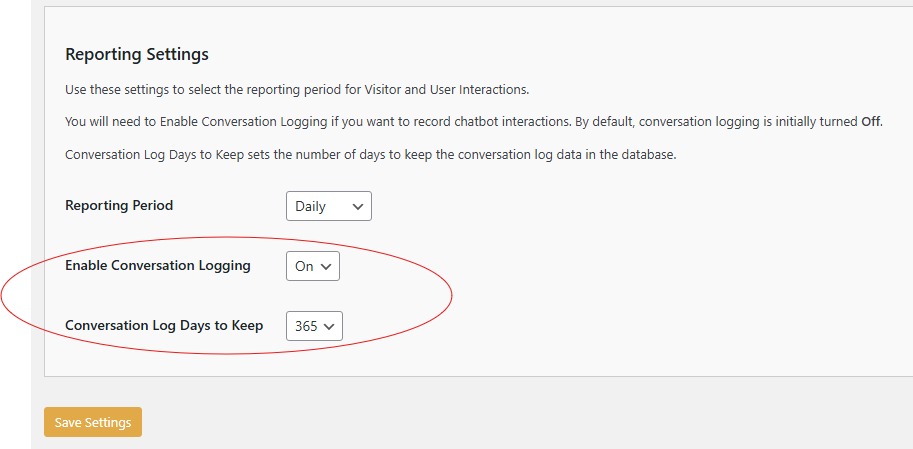
- Set the “Reporting Period” to one of “Daily”, “Monthly”, or “Yearly”. NOTE: This setting determines the period for aggregating Interaction and Token Usage statistics on the “Reporting” tab.
- Set “Enable Conversation Logging” to “On” to activate logging.
- Specify the duration for retaining conversation logs by setting the “Conversation Log Days to Keep” field. The default is 365 days with options for 1, 7, 30, 60, and 90 days of history with data beyond those dates periodically being purged.
- Click “Save Settings” to apply your changes.
Additional Tips
- Ensure the Kognetiks Chatbot plugin is activated and properly configured.
- Conversation logging must be enabled in your chatbot settings to use the shortcode effectively.
- Customize the appearance of the conversation history using your website’s CSS if needed.
By following these simple steps, your visitors and users can easily access and review previous interactions with your Kognetiks Chatbot, improving their user experience on your website.
#HowTo #ConversationHistory #KognetiksSettings
About the Author

Stephen Howell is a multifaceted expert with a wealth of experience in technology, business management, and development. He is the innovative mind behind the cutting-edge AI powered Kognetiks Chatbot for WordPress plugin. Utilizing the robust capabilities of OpenAI’s API, this conversational chatbot can dramatically enhance your website’s user engagement. Visit Kognetiks Chatbot for WordPress to explore how to elevate your visitors’ experience, and stay connected with his latest advancements and offerings in the WordPress community.
Leave a Reply
You must be logged in to post a comment.